https://exploreflask.com/en/latest/configuration.html
Templates
Key takeaways
- Sử dụng Jinja làm template engine.
- Standard Context:
config,request,session,g,url_for(),get_flashed_messages() - Có thể cân nhắc khi nào cần/ không cần
autoesscapehtml. - Jinja support
filter(một dạng tương tự với các filter bên Angular), mình có thể registerfilterbằng@app.template_filter - Streaming: Không render hết template 1 lượt mà sẽ streaming dần.
Links
Testing Flask Applications
Key takeaways
-
Mục đích của
fixtureslà viết từng đoạn code nhỏ để có thể tái sử dụng được. Một số thư viện như pytest-mock, bản chất là nó tạo ra các fixtures để có thể add vào function test. -
Simple fixture return value, nhưng cũng có thể là setup, yield a value and teardown.
-
Client test tạo request tới app mà không chạy 1 live server. Sử dụng
get(),post()để tương tác.- Với query string:
query_string={"key": "value", ...} - Với form-data, gửi bằng: `client.post(‘/url’, data={“name”: “Flask”, …})
- Với json data: `client.post(‘/url’, json={“query”: …})
- Với query string:
-
Để access vào Flask’s context variables, ví dụ session, ta cần sử dụng
withstatement, như thế thì app và request context sẽ vẫn active sau khi making request, cho tới khi blockwithends. (with client:) -
Test với app context hoặc request context:
with app.app_context()hoặcwith app.test_request_context()
Links
Handling Application Errors
Key takeaways
-
Có thể sử dụng
sentry-sdkđể push errors. -
Error handlers:
- Cần register error: → cái này làm ở file
application/handlers.py
@app.errorhandler(werkzeug.exceptions.BadRequest) def handle_bad_request(e): return 'bad request!', 400- Handle các errors:
HTTPException,Exception, … Nếu không có handler nào được register cho 1 exception,flask.Flask.handle_exception()sẽ được call → InternalServerError. - Có 2 cách để implement. 1 là dùng
decorator, 2 là viết hàm handle, sau đóregister_error_handlervới application/ blueprint.
- Cần register error: → cái này làm ở file
-
Custom error có thể viết riêng sang class khác, sau đó raise errors trong Controller.
-
Ở production mode, nếu errors mà không được catch thì mặc định sẽ trả về lỗi 500. Nhưng ở development mode, error sẽ được đẩy nguyên về WSGI server. Như thế lỗi sẽ được hiển thị ở development mode.
Links
Debugging Application Errors
Key takeaways
- Không bao giờ bật chế độ debugger trên Production. Sử dụng logging tool (Sentry, …) or Logging để in ra lỗi.
- Use this command to enable
--debug:flask --app hello run --debug
Links
Logging
- Sử dụng module
loggingđể in log. Có thể config output log in ra dựa vàodictConfig(): output, stream, formatter, root level, handler, … - Có thể remove default Handler hoặc sử dụng
logging.handlers.SMTPHandlerđể send email lỗi cho Admin - Injecting Request Information bằng cách viết 1 class custom, eg
RequestFormatter, sau đó add thêm request context từflask.
Configuration Handling
- Sử dụng
app.configđể custom configurations: Toggle the debug mode, Setting Secret Key, ENV-specific things. - Builtin Configuration Values: ENV, DEBUG, TESTING, SESSION_COOKIE_HTTPONLY, SESSION_COOKIE_SECURE, APPLICATION_ROOT, MAX_CONTENT_LENGTH, PROPAGATE_EXCEPTIONS (handle error) …
https://flask.palletsprojects.com/en/2.2.x/config/#builtin-configuration-values
- Cách tốt hơn để config là get configuration từ file (python file, data files, ..)
- Config từ ENV. Prefix mặc định của app sẽ là
FLASK_. dấu__sẽ có thể được hiểu là[] - Some configuration is stored in
instancefolder.
Best Practices:
- Tạo application in a function, register blueprints on it.
- Do not write code that needs the configuration at import time.
- Make sure to load the configuration very early on.
Signals
Set, Gửi/ Nhận Signal?
Mình đang hiểu là các tín hiệu thông báo sẽ làm việc A, việc B, … (Được dùng trong Flask - How a Request is Handled )
Class-based Views
Mục đích là để tạo ra các views sao cho có thể tái sử dụng lại nhiều lần.
https://flask.palletsprojects.com/en/2.2.x/views/
Class that acts as a view function. - Generic, Reusable or Pluggable views.
class ListView(View):
    def __init__(self, model, template):
        self.model = model
        self.template = template

    def dispatch_request(self):
        items = self.model.query.all()
        return render_template(self.template, items=items)


app.add_url_rule(
    "/users/",
    view_func=ListView.as_view("user_list", User, "users.html"),
)
app.add_url_rule(
    "/stories/",
    view_func=ListView.as_view("story_list", Story, "stories.html"),
)
Ta có thể sử dụng view decorator cho gọn code. Just remember that order matter.
@app.route("/users/")
@login_required
@cache(minutes=2)
def user_list():
    ...
Ta có thể custom để sử dụng kiểu shared view. Viết view chung, sau đó register view.
Application Structure and Lifecycle
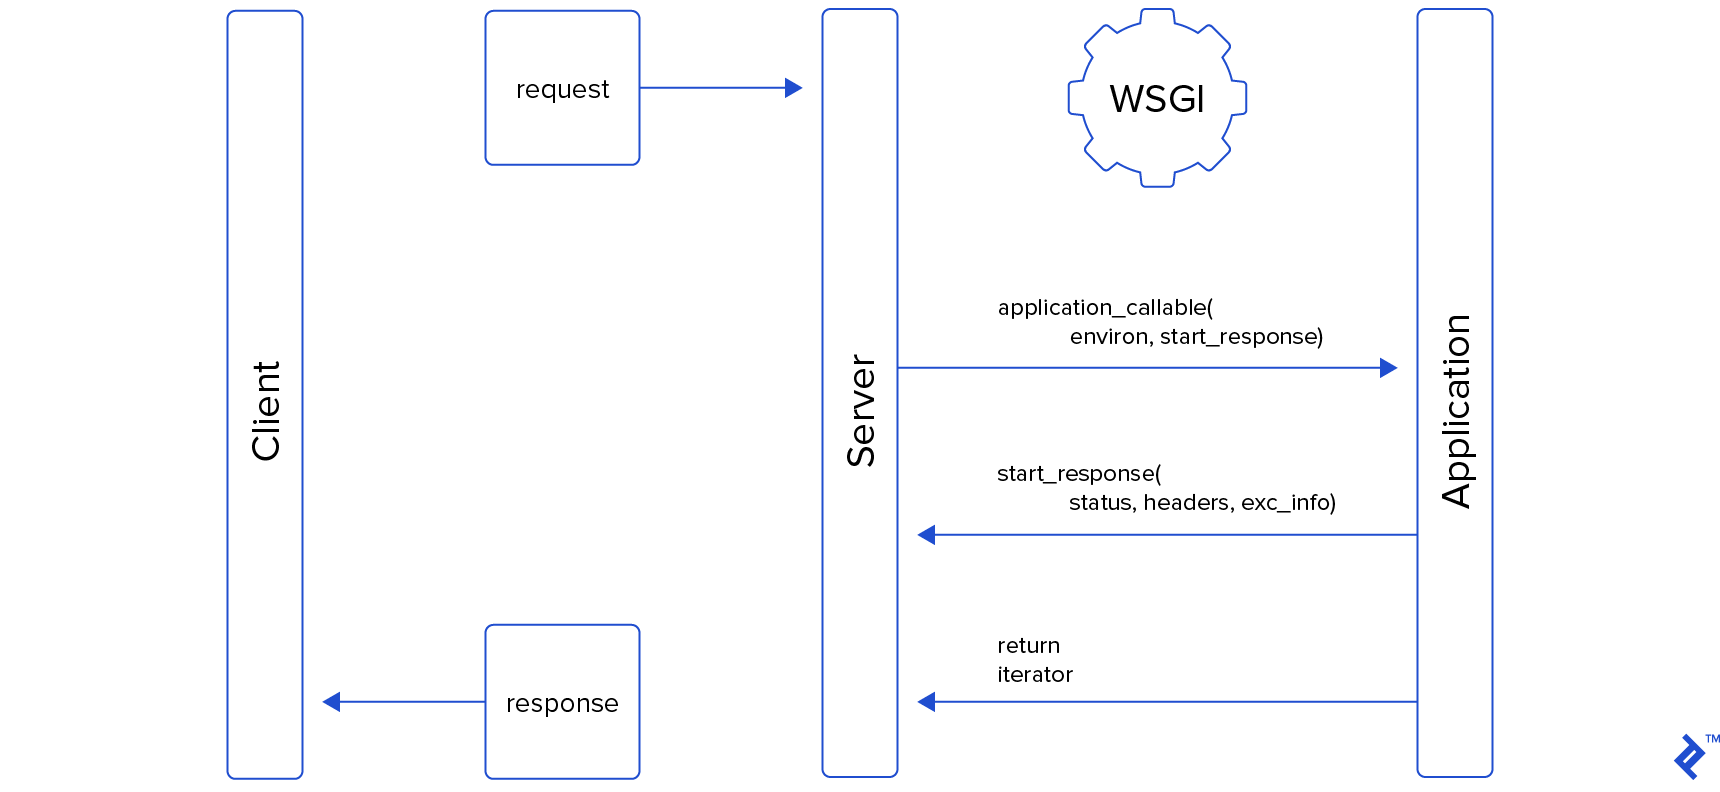
Flask is a WSGI application framework. The other half of WSGI is the WSGI server.
WSGI - Web server Gateway Interface - nhận request, convert HTTP data to WSGI environ dict. After that, it calls WSGI application (Flask) with the environ. Flask route the request to View function, handler errors, … Flask translate View function return to WSGI response data, parse it to WSGI server. WSGI server creates and send an HTTP response to client.
Về mặt bản chất thì thằng WSGI này gần giống như 1 rack app bên Rails - App server :think: Có nhiệm vụ đọc thông tin từ request, pass vào Rails Application, sau đó nhận response, và convert lại về thành data để trả lại cho Web server.
Middleware là một WSGI mà wrap một WSGI app khác. (Giống với concept của Python decorators). Middleware ngoài cùng được gọi là Server. NÓ có thể modify data truyền vào, và gọi tới các WSGI app khác. Flask là application cuối cùng của chain middleware đó.
Một middleware phổ biến đó là Werkzeug’s ProxyFix, modifies request cho giống với việc nó truyền trực tiếp từ client (chứ k phải qua HTTP proxies)
Request Flow
Link to original
- WSGI server calls the Flask object.
Flask.wsgi_app()- A
RequestContext,AppContextis created. This converts the WSGIenvirondict into aRequestobject.- The app context is pushed -⇒
current_appandgavailable.- The
appcontext_pushedsignal is sent.- The request context is pushed -⇒
requestandsessionavailable.- Load existing session data using app’s
session_interface- Check URL matched with
route()decorator. If not match (404, 405, ..) is stored to be handled later.- The
request_startedsignal is sent.- Any
url_value_preprocessor()decorated functions are called.- Any
before_request()decorated functions are called.- If no URL match (above), raised errors now.
- View function which is associated with
route()decorated is called.- If there are any errors,
errorhandler()decorated function is called to handle errors and return response.- Whatever response (before request function, view, error handler) is converted to a
Responseobject.- Any
after_this_request()decorated functions are called, then cleared.- Any
after_request()decorated functions are called, which can modify the response object.- The session is saved, persisting any modified session data using the app’s
session_interface.- The
request_finishedsignal is sent.- With exception, those handled now, with status code, response, … The
got_request_exceptionsignal is sent.- The response object’s status, headers, and body are returned to the WSGI server.
- Any
teardown_request()decorated functions are called.- The
request_tearing_downsignal is sent.- The request context is popped,
requestandsessionare no longer available.- Any
teardown_appcontext()decorated functions are called.- The
appcontext_tearing_downsignal is sent.- The app context is popped,
current_appandgare no longer available.- The
appcontext_poppedsignal is sent.
The Application Context
The application context keeps track of the application-level data during a request.
current_app and g are proxies object.
WHY
- Nếu sử dụng
app factory patternhoặc viết reusable blueprint/ extensions thì sẽ không cóappinstance để mà import. ⇒ Để truy cập thông tin của app instance, thì Flask cung cấpapplication context. Thay vì truy cập trực tiếp vàoapp, ta sẽ truy cập quacurrent_appproxy.
Tức là bình thường, nếu muốn truy vấn thông tin của application instance, ta cần truyền app vào các function. Ví dụ:
# Có proxy
from flask import Blueprint, current_app

bp = Blueprint('my_blueprint', __name__)

@bp.route('/')
def index():
    app_name = current_app.name
    # do something with app_name
    return "Hello, World!"

# Không có proxy
from flask import Blueprint

bp = Blueprint('my_blueprint', __name__)

def index(app):
    app_name = app.name
    # do something with app_name
    return "Hello, World!"
⇒ Về bản chất thì đây là 1 Local Proxy, giúp chúng ta access vào application instance dễ dàng hơn.
Lifetime
- Khi request đến, Flask push application context và request context. Khi request end, nó lại pop thông tin này ra.
- Nếu muốn access
application_contextoutside, nên đặt nó trong blockwith. Eg:with app.app_context():
g object
- Mục đích: Lưu trữ common data during a request or CLI command.
- Data này chỉ lưu được trong request, muốn share giữa cá request cần lưu thông tin vào
sessionhoặc database.
Common cases của thằng g object này là:
get_X(): Create resource X nếu nó không tồn tại, sau đó cache nó vàog.Xteardown_X(): Close/ deallocates nếu resource tồn tại. Nó sẽ được register vớiteardown_appcontext()handler.
Case hay được dùng là cho db. Tất cả các request tới db trong 1 request sẽ dùng chung 1 connection.
The Request Context
Thằng Application Context thì lưu trữ data ở tầng application-level, còn Request Context thì sẽ lưu trữ data ở tầng request-level. Cả 2 thằng này đều lưu data tồn tại ở trong request.
Mục đích
Vì một worker (thread, process, coroutine) chỉ handle 1 request tại 1 thời điểm, nên request data có thể lưu ở dạng global.
View functions, error handlers, and other functions trong 1 request có thể truy cập vào request proxy, trỏ tới request object.
Push a context manually
- Thường thì dùng khi mình cần chạy test, và cần access vào
requestcontext. - Sử dụng
app.test_client()hoặcwith app.test_request_context()
How it works
- Request đến,
Flask.wsgi_app()được gọi, convert WSGI environ dict thànhRequestObject. AppContextđược tạo, push vào context stack. (Mỗi request sẽ có 1 context stack). Lúc này,current_appvàgobject available.- Trong quá trình gọi request, nếu cần truy cập vào
requestvàsessionobject,RequestContextsẽ được push vào stack, making request & session available. - Khi các context này được push vào stack, các proxies phụ thuộc vào nó sẽ được active, trỏ vào context mới nhất ở trong stack
Signals
Các signals được gửi:
- request_started → before before_request()
- request_finished → after function after_request() is called
- got_request_exception → is sent when exception begins to be handled, but before an errorhandler() is looked up or called.
- request_tearing_down → teardown_request() is called.
https://flask.palletsprojects.com/en/2.2.x/reqcontext/
Modular Applications with Blueprints
Check all urls with app.url_map.
HOW
Khai báo 1 blueprint, define name, url prefix nếu cần. Register vào application với command
app.register_blueprint(XXX.bp).Ta có thể register 1 blueprint này vào 1 blueprint khác (nesting blueprints.)
Blueprint Resources
- Resource folder:
single_page.root_path.- Static files:
admin = Blueprint('admin', __name__, static_folder='static')- Template folder: Use options
template_folder='template'khi khởi tạo.- url building:
url_for('admin.index')- Error handlers:
@simple_page.errorhandler(404)Link to originalNotes
Application Object: Center object của Flask application. (
Flask(__name__)). Nhiệm vụ handle incoming request, routing them tới view functions, return response.Extensions: Các package riêng lẻ có thể cài và integrate với Flask. Vd: Flask-SQLAlchemy. Flask làm theo kiểu modular design nên rất dễ để add extra functionality.
Blueprints: Way to organize related views and other code into separated modules. Một application to có thể chia thành nhiều blueprints nhỏ, trong đó bao gồm cả routes, views, templates, … Sau đó có thể register blueprints này với application object, making those routes available.
Extensions
Extensions là các extra packages mà add thêm functions vào cho Flask application. Ví dụ: Sending email, connect to DB, REST API support, …
Có thể search package với tagged: Framework::Flask.
Để dùng extensions thì follow theo guide hướng dẫn. Nhưng đại đa số là bọn nó sẽ pull their own configuration từ app.config và pass application instance vào để khởi tạo.
Ví dụ:
from flask_foo import Foo
foo = Foo()

app = Flask(__name__)
app.config.update(
	FOO_BAR='baz'
)

foo.init_app(app)
Command Line Interface
Development Server
Working with the Shell
Patterns for Flask
Security Considerations
Deploying to Production
Using async and await
Questions
- Application Factories là gì?
- super() trong Python